 |
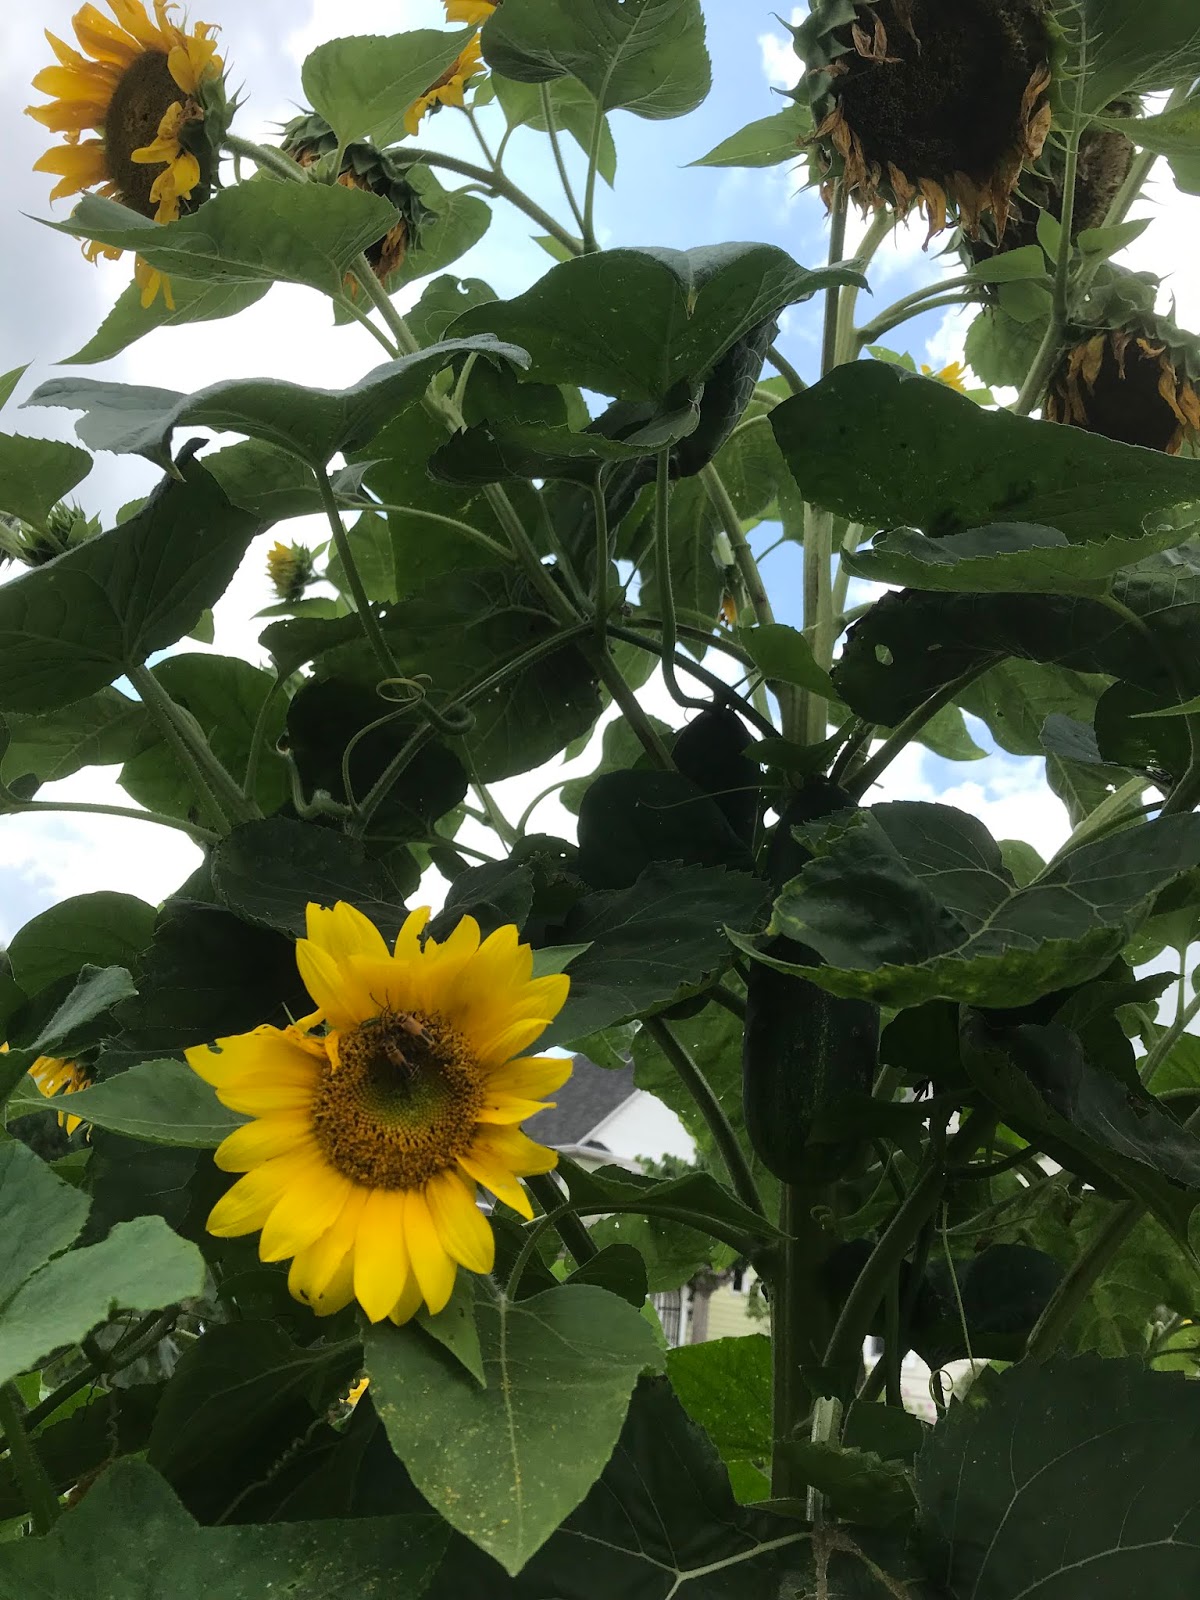
| Cucumbers climb up sunflowers |

Monday, February 3, 2020
Cucumbers Love Sunflowers
Tuesday, February 19, 2019
My Favorite Vegetable Garden Seeds for 2019
Best Beans for Making Dilly Beans
Roc d'Or Bush Bean - a lovely color to mix in with the green beans, a nice buttery flavor and good disease resistance.
French Emirite Pole Bean and French Gold Filet Pole Bean - I like to have these beans growing for when the bush beans are done producing. They make decent Dilly Beans, but you have to cut them down more.
All of these varieties work well for Pressure Canned beans as well. I save the end pieces and the not so straight beans to can for green beans.
Cucumber for Fresh Eating and Pickles
Green Fingers Persian Baby Cucumbers - These were great for fresh eating, smooth thin skin and appealing dark color. They produced so heavily that we couldn't keep up with eating them, and they are best picked small. It says that it is mildew resistant, but it was attacked by some fungus in my garden late in the summer (which was a very wet year).
Endeavor Pickling Cucumber - This is a nice classic pickling cuke. Last year's extra moisture was great for the cucumbers, and I had a bumper crop to fill my shelves with pickles. They are also fine for fresh eating, but I prefer to peel the thicker skin on these.
Peas of all Sorts
Magnolia Blossom Tall Snap Peas - This was our favorite pea for it's looks (high climbing vines with gorgeous purple flowers) and for it's abundant sweet snap peas. My kids snacked all spring on these, it produced for a long time.
Sabre Shelling Pea - This is what I use for shelled peas. It is a good producer, but not very tall, so you don't need too high of a trellis. I don't can peas because they are too good and get eaten right away, barely making it to the pot!
Best Pepper Mixes
Southwestern Chili Trio - This mix contains 3 types of peppers perfect for making salsa. The combination gives it an amazing flavor and just the right amount of heat for a medium salsa. I use the Zesty Salsa recipe from Ball with these peppers and a few green peppers and it is amazing!
Orange Sun and Jupiter Sweet Bell Peppers - This is mix of red and orange peppers and they are so sweet and delicious (and good for you!) I can't grow enough of them.
Baby Belle Mini Snack Peppers - This mix of red and yellow mini sweet peppers are great for snacking, sometimes right in the garden. The kids love them (and the grownups too). In my experience, the yellow is a little bigger of a pepper and a more vigorous plant.
 |
| I Love Black Krim Tomatoes! |
Tomatoes for Different Purposes
Black Krim - This is our favorite tomato for slicing. The delicious sweet and juicy flavor is great on sandwiches, especially BLTs! It is a large fruit, which can get you one nice big slice that fits perfect on your sandwich.
Chianti Rose - I started growing this tomato as an improvement on Brandywine. It is lovely pink, good sized fruit, with less cracking than the Brandywine. We like it for slicing and juicing.
Italian San Marzano - This is my favorite paste tomato, with good fruit and better disease resistance than the Amish Paste. The plant tend to be more sturdy as well.
I get the majority of my seeds from Renee's Garden. Their quality and prices are excellent, they are always adding new interesting seeds, and they sell Heirloom varieties, which I feel is very important.
Saturday, February 22, 2014
Heirloom Beans- The Search for the Perfect Bean
Looking for a good reliable source for Heirloom Seeds? My favorites are Baker Creek and Renee's Garden Seeds.
The last couple years I have been on the hunt for the perfect bean. I wanted something that would can and freeze well, make good dilly beans, taste great fresh, be stringless, and have reliably good yields.
Following are a the bean varieties I tried and the results...
I was really hoping for a good bean to make Dilly Beans, and they were all good! I wondered if the thinner beans would be less crisp pickled but they all turned out delicious! The thinner beans tended to be longer, so they filled the quarts nicely. I like to combine yellow and green beans for a nice looking jar of Dilly Beans.
I have also tried growing the purple pod varieties of beans, but gave them up. They do have a nice appearance and flavor, but are not nearly as vigorous as the yellow and green.
My other bean observations -
The last couple years I have been on the hunt for the perfect bean. I wanted something that would can and freeze well, make good dilly beans, taste great fresh, be stringless, and have reliably good yields.
Following are a the bean varieties I tried and the results...
- Provider Bush Bean - high yields of nice big beans with typical bean flavor
- Slenderette Bush Bean- thin dark green pods with tender sweet flavor. Ripe earlier than some others
- Emerite and French Gold Filet Pole Beans - The gold outperformed the emerite, and had tremendous season-long yields! They had a nice flavor and worked well pickled and frozen.They were also very pretty with the long yellow pods.
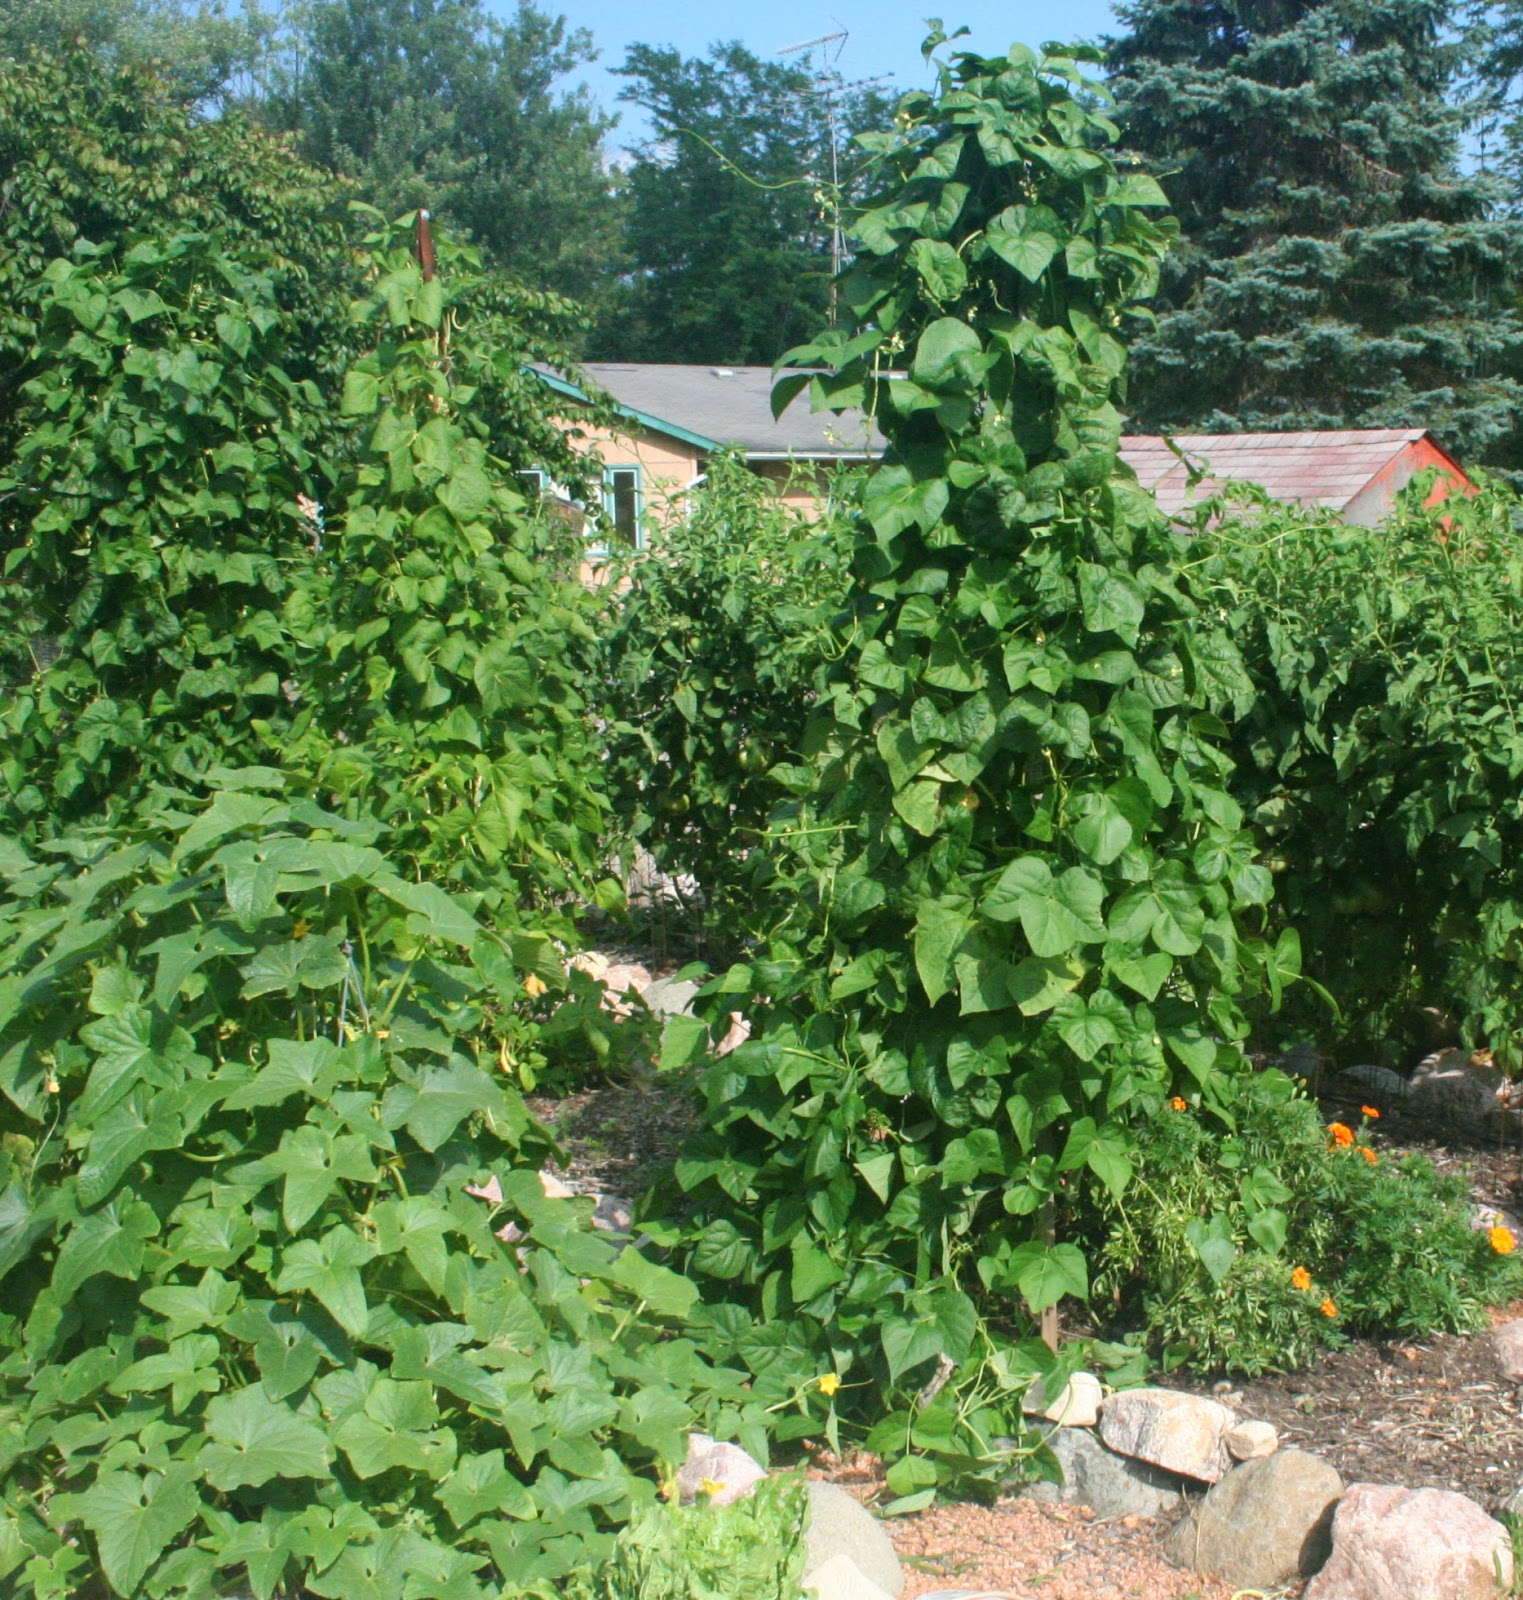 |
| Lush green growth - pole beans on cedar trellis |
I have also tried growing the purple pod varieties of beans, but gave them up. They do have a nice appearance and flavor, but are not nearly as vigorous as the yellow and green.
My other bean observations -
- Pole beans with flatter pods do no have the flavor and crispness of the round types
- Yellow wax beans are also good to mix with the green types
- The usual Blue Lake types just aren't good enough to be the perfect bean
- Slender beans are very tasty!
- Beans are best picked before they get too ripe - about the thickness of a pencil (thinner for the slender varieties)
- Pole beans are more prolific and produce longer than bush beans but the flavor is usually not as good. They also use less space because you can use vertical trellises
- Most bush beans with have one big crop, and then more small crops if you keep them picked
- Fancy colored and spotted type bean pods will all turn green when cooked (except yellow)
Monday, January 14, 2013
Old Fashioned Pecan Pie Recipe
 Pecan Pie is my dad's favorite dessert, so for his birthday this year I found a recipe for this delicious pie made the old fashioned way. It is not even close to low fat or low calorie, but it is amazing! Using real maple syrup instead of corn syrup can be more costly, but it is worth it. I recommend trying it out, you won't be sorry!
Old-Fashioned Pecan Pie
From Cook's Country
The pecan pies of today bear little resemblance to their 19th-century inspiration. Could we recreate Old-Fashioned Pecan Pie without using modern-day processed corn syrup? Many traditional syrups (cane, sorghum) produced a great pie, but we had to mail away for those ingredients. In the end, combining maple syrup with brown sugar and molasses replicated the old-fashioned versions perfectly. We started the pie at a high oven temperature and then dropped the temperature to ensure the bottom crust was crisp and golden brown.
Tuesday, October 30, 2012
Tools to Make Canning and Preserving Easier
Canning and preserving food the old fashioned way takes time and effort, there is no doubt about it. I think it is worth it, so I have found some new fashioned tools to make old fashioned home canning easier and take less time.
 When you are quartering, chopping or peeling fruits or vegetables, it helps to have an over the sink cutting board
 . It's close to where you need it to be, and keeps juices and scraps contained instead of dripping all over the floor. Juicy tomatoes are notoriously messy to cut. I found one that is adjustable and has a drain type area to put scraps. If I had lots of money to spare I would get one with a colander attached.

 A food processor is very helpful for quick slicing, dicing, shredding, chopping, and pureeing. I love my KitchenAid 12-Cup Food Processor
 . It works great for soups, salsas, and purees when I don't want to spend too much time chopping. It is also a very useful machine for everyday in the kitchen. KitchenAid makes a very good food processor. It is powerful, well made, easy to clean, and they provide a great warranty and customer service.
 My KitchenAid Stand Mixer is an integral tool in my kitchen. I use it all the time. You can also get some wonderful attachments to make fruit and vegetable processing easier.
The Mixer Attachment Pack for Stand Mixers
My KitchenAid Stand Mixer is an integral tool in my kitchen. I use it all the time. You can also get some wonderful attachments to make fruit and vegetable processing easier.
The Mixer Attachment Pack for Stand Mixers has a grinder/shredder and a strainer. The grinder/shredder works really good for shredding or slicing large quantities of vegetables. The strainer attachment is great for tomatoes and fruits. It removes seeds and skins effortlessly. I use it all the time to prepare big batches of tomatoes for juice or sauce and for fruits to make jam or sauce.
Over Sink Cutting Board
When you are quartering, chopping or peeling fruits or vegetables, it helps to have an over the sink cutting boardFood Processor
A food processor is very helpful for quick slicing, dicing, shredding, chopping, and pureeing. I love my KitchenAid 12-Cup Food ProcessorKitchenAide Mixer Attachments
My KitchenAid Stand Mixer is an integral tool in my kitchen. I use it all the time. You can also get some wonderful attachments to make fruit and vegetable processing easier. Saturday, September 29, 2012
Easy Jambalaya
Until I figured out this recipe, Jambalaya sounded complicated and exotic. Once I made it and it turned out awesome and super easy, I realized that it's basically a thick soup or stew, and it all made sense from there.
This was one of the first dishes I made for my husband when we first met. It is hearty and spicy and perfect for impressing a man who likes to eat.
It's a pretty easy, relatively quick recipe, and you can make it from scratch or with leftovers. It can be a great way to use up leftover meats and rice.
This recipe is a 'creole style' jambalaya, as opposed to the 'cajun style' which does not have tomatoes.
I always serve it with my skillet cornbread (I will post the recipe for that one next!)
In my last post about making soups , I broke down soup into a basic formula with basic instructions.
Basic Soup Recipe= Stock + Bulk + Flavor + Seasonings + Extras

Slow Cooker Directions:
You can use a slow cooker if you choose, but as I learned the hard way, the rice turns into a gluey unappetizing mess if you slow cook it. For the best results, add cooked rice and meats and heat through just before serving. If you are using raw meat you could slow cook it with the rest (except for shrimp).
(Low 7-9 hours, High 3 hours)
This was one of the first dishes I made for my husband when we first met. It is hearty and spicy and perfect for impressing a man who likes to eat.
It's a pretty easy, relatively quick recipe, and you can make it from scratch or with leftovers. It can be a great way to use up leftover meats and rice.
This recipe is a 'creole style' jambalaya, as opposed to the 'cajun style' which does not have tomatoes.
I always serve it with my skillet cornbread (I will post the recipe for that one next!)
In my last post about making soups , I broke down soup into a basic formula with basic instructions.
Basic Soup Recipe= Stock + Bulk + Flavor + Seasonings + Extras

Jambalaya
2 T vegetable or olive oil
1 cup chopped onion
1/2-2/3 cup chopped celery
1/2 cup chopped green pepper
4 gloves minced garlic
1/2 can tomato paste
4 cups chicken broth
28oz can diced tomatoes (undrained) or 1 quart of tomatoes from your garden
1.5 cup long grain rice
2 t dried thyme, 1 t dried basil, 2 bay leaves, 1/2 t dried red pepper, 1/4 t black pepper
6-8 cups of any 3 meats (cubed ham, shrimp, sausage, chicken)
Stock: The stock in Jambalaya is made from the vegetable trinity and tomato paste.
- Heat oil in a pot
- Cook the Vegetable Trinity (onion, celery, pepper) in the oil until tender
- Add 4 cloves of minced garlic and 1/2 can tomato paste
- Heat and stir until fragrant and mahogany in color
Bulk & Seasonings: The bulk is the rice and tomatoes
- Add uncooked rice, broth, and tomatoes to the mix (if you have pre-cooked rice, omit the chicken broth and add at the end. May need to add salt and pepper to taste)
- Add dried seasonings
- Bring to a boil, then simmer covered for 15 minutes or until rice is done
Flavor: The various meat or seafood you choose to add make up the flavor of the jambalaya. My favorite combination is ham, shrimp, and andouille sausage. It's easiest to use already cooked meats, but if you choose to use raw, you may have to modify the cooking time.
- Add your chosen meat and heat through.
- Taste and add more salt, pepper or hot sauce if needed.
Slow Cooker Directions:
You can use a slow cooker if you choose, but as I learned the hard way, the rice turns into a gluey unappetizing mess if you slow cook it. For the best results, add cooked rice and meats and heat through just before serving. If you are using raw meat you could slow cook it with the rest (except for shrimp).
(Low 7-9 hours, High 3 hours)
Tuesday, September 25, 2012
Super Soups
I love making soups, because they
are easy, fun, and healthy. Soups also take very little time or thought to
prepare, both of which are in short supply on busy days. Plus, it’s almost
impossible to make a bad batch of soup. You can always add more seasonings, or
more water if it’s too strong, and if you overcook the vegetables you can puree
and turn into a chowder. Soups are also
a great way to make meat go farther, and a creative way to use leftovers.
If you learn the basics of making
soup, you can whip up a pot in no time without a recipe. I enjoy the spontaneity,
making it up as I go. You can make a big pot and freeze or can for later
enjoyment. I can my soups in the summer and we enjoy wonderful healthy homemade
soups all winter long.
There are options for every
schedule. You can throw ingredients in a crockpot and have magically ready for
dinner, or you can throw ingredients in a pot on the stove and have ready in a
couple hours, mostly unattended.
Basic Soup Recipe
- Stock
- Bulk
- Flavor
- Seasonings
- Extras
Stock or Broth
Every soup starts with a stock or
broth. This is the liquid part of the soup. It can be meat or poultry stock, or
vegetable stock. You can use homemade stock or store-bought. If you do buy it
at the store, look for low salt, no MSG, and say no to the bouillon cubes. I
like to use a high quality concentrated liquid stock. It’s expensive but well
worth it.
Ambitious folks make their own
stocks, but I don’t have the time or storage space. For vegetable soups, you can make a simple
stock of onion, carrots, celery, bay leaf and seasonings, simmered for 20
minutes.
Bulk
The bulk of the soup is the
vegetables. The combinations are up to you. See the list below for ideas. Keep
in mind strong flavored vegetables can overpower others. Chop the veggies into
uniform pieces so they cook evenly.
Flavor or Base
The flavoring of your soup can be
a meat or poultry, or a strong flavored vegetable. Examples of strong flavored
vegetables are broccoli, cauliflower, asparagus, tomato, and cabbage. Chop into
uniform pieces and add to the stock.
If you are using raw meat or a
soup bone, you will probably need to separate the fat when the soup is done. I prefer to precook the meat or use leftover
meat. If you do have to separate the fat you can do it by skimming off the top
with a spoon, using a special fat separator, or refrigerating and removing the
solid fat off the top.
Seasonings
When you have all of your
ingredients in the pot, bring to a boil and then turn down the heat and simmer
for a half hour to an hour (depending on the size and rawness of your
ingredients). Now comes the fun part, the tasting! Taste the liquid part of the
soup and season to your tastes. Add salt, pepper, herbs, and red pepper as
needed. Let it simmer a bit longer and taste again.
If the flavor seems to be missing something,
try a splash of something acidic. I’ve found that this is the secret ingredient
that seems to round out the flavor of the soup. Depending on the flavor of your
soup, you can add red wine vinegar, rice wine vinegar, or even regular white
vinegar. Lemon or lime juice is good in tomato based soups. You can experiment,
but try a little at a time and see what happens. Have fun! The soup is done
when the vegetables are cooked through and the taste is how you like it.
Extras
You can make your soups more fun
and more filling with some extras such as pasta, grains, and dairy products.
Pastas and grains can be cooked in the soup, but will absorb much of the liquid
and make the soup thicker. The texture can be a little different, so some
people will cook separately and add at the end. Egg noodles and smaller pastas work
well in soups. Grains such as barley and rice are also a nice addition to make
soup more substantial.
To make a creamy soup, simply
puree the vegetables after they are cooked, and add cream, milk or sour cream
before serving. Mashed potatoes can also be used to thicken a soup without
adding fat. You can also use flour or
cornstarch to thicken a soup, see the Condensed Cream of Anything Soup recipe
for more.
Cooking
If using a slow cooker, cook on
low for about 10 hours or high for about 6 hours. If cooking by stovetop,
simmer for 1 to 1.5 hours, or until vegetables are the texture you like.
Storing Your Soup
Soups make fabulous leftovers in
the refrigerator or freezer. The only issues you may have are with the extras.
Pasta, grains, and cream don’t always reheat well. The soup will still be
edible and taste the same, but the texture can change. This has never stopped
me, but if it bothers you, you can keep those ingredients separate and add
before reheating.
Sunday, September 23, 2012
Natural Baby
As the saying goes, having a baby changes everything. There are so many choices to make and green/natural options to weigh. I spent much time researching, planning, and shopping for the best earth friendly baby products.
I realize that not everyone wants to hear about the down and dirty baby stuff, so I created a separate blog to share what I learned about bringing up baby green.
See posts about cloth diapering, and washing cloth diapers with soapnuts.
I realize that not everyone wants to hear about the down and dirty baby stuff, so I created a separate blog to share what I learned about bringing up baby green.
See posts about cloth diapering, and washing cloth diapers with soapnuts.
Wednesday, August 8, 2012
Good Old Fashioned Percolator Coffee
 |
| Percolator heating up |
We became hooked on the percolator after using a small aluminum pot on our camping excursions. Nothing can quite compare to coffee made over an outdoor fire. One day we decided to buy a glass percolator for home use, and we never looked back.
 |
| Starting to bubble up |
The only issue with percolator coffee is the risk of over-heating, which can make the coffee bitter. It takes some practice, but after you have the method down, you can make a pretty decent cup of coffee.
1. Add cool water too percolator.
 |
| Coffee is done! |
3. Add coarse ground coffee to the filter basket, 2 tsp per cup and put the basket lid on (no paper filter needed)
4. Place the glass lid on the pot and heat on Medium until it starts to percolate
5. Once you see bubbling in the top, turn to low and let it perk for 2-3 minutes.
You don't want to let the coffee boil, because this can make the coffee bitter or acidic.
The best coffees to use are smooth and low acid beans that are ground very coarse. We like to use fresh ground, locally roasted, Organic Fair Trade whole beans.
The glass percolator is easy to clean- all parts can go in the dishwasher, and stains clean up nicely with vinegar.
It takes more time than a drip coffeemaker, but we enjoy the ritual and love the clean, plastic and paper-free taste of old fashioned percolator coffee.
Friday, August 3, 2012
Saving Money on Natural Products
I'm sure we all would like to use more natural products, but many products labeled 'Green', 'Natural' or 'Organic' can be cost prohibitive.
I have done some experimenting with products, and in order to make it into our routine for good they must work well and be a good price. Here's a couple that I have found:
We preferred the original recipe, before the company sold out (google it for more info). The updated version was not as good, but they seem to have made some adjustments, and it is better now. It is more expensive than conventional brands, but we can buy it online in multi-packs and save money.
I have done some experimenting with products, and in order to make it into our routine for good they must work well and be a good price. Here's a couple that I have found:
Tom's of Maine Toothpaste
This brand has many flavors to choose from but we prefer the Peppermint Baking Soda with Fluoride. We experimented with other natural brands without fluoride, but we noticed our teeth started to hurt after a while. This one works great and we have been using it for years with no cavities. After you have used a natural toothpaste for a while, if you use a conventional brand it will actually feel like your mouth is burning and have sickly sweet taste.We preferred the original recipe, before the company sold out (google it for more info). The updated version was not as good, but they seem to have made some adjustments, and it is better now. It is more expensive than conventional brands, but we can buy it online in multi-packs and save money.
Seventh Generation Dish Soap
Soap is soap, and this one works just fine. I like that it is non-toxic, biodegradable, and free and clear of fragrances and dyes. I use it as dish soap and diluted for hand soap. I save money buy buying it online in a case of 6 bottles.Wednesday, November 24, 2010
Upcycling!
We all know that we shouldn't be consuming so many snack products and disposable items, but sometimes the convenience is hard to resist. If you must consume chips and cookies or use plastic baggies, now there is a way to recycle the packaging.
TerraCycle (original sellers of worm poo fertilizer) started a program to 'upcycle' non-recyclable packaging.
You can sign up to join a trash collecting 'brigade' for materials like old pens or certain brand packaging, and TerraCycle sends you a postage paid box to send the trash in to be processed. Manufacturers sponsor the program by donating a few cents per item to a charity. The trash is then made into interesting products and sold at major retailers at an affordable price.
It's a great idea for fundraising and keeps more trash out of landfills. Some of the products seem a little iffy to me, like making notebooks and backpacks that are emblazoned with snack food packaging, but other programs are really great. For example, schools can collect used ziplock bags and raise money, and the bags are turned into products like cutting boards.
Seems like a win-win situation. Manufacturers take some responsibility for their packaging, less of it ends up in landfills, non-profits can raise money, and kids can learn about waste streams and recycling.
Wednesday, February 24, 2010
Time to Plan Your Garden!
It's my favorite time of year again! Time to plan the garden for spring!
How hard it that, you may wonder? I may be strange, but I look at it as a yearly experiement, trying new things and researching what works together. It's as complex as you want to make it, but to maximize the health of your garden, and get the best yields, there are some steps to follow. I start in late winter, when it is cold and dreary and you need something to look forward to.
1. Select your seeds- peruse your seed catalogs and find the best varieties for your zone and site. Pay attention to disease tolerance.
4. Draw your Garden Plan - Draw a map of the garden from your list. Include number of plants and spacing (more research!)
5. Wait Anxiously for the Ground to Thaw- This is by far the hardest part of this whole process. Hopefully you are starting some seeds indoors and that will help with some of the cabin fever (starting seeds is a whole other post, stay tuned!).
How hard it that, you may wonder? I may be strange, but I look at it as a yearly experiement, trying new things and researching what works together. It's as complex as you want to make it, but to maximize the health of your garden, and get the best yields, there are some steps to follow. I start in late winter, when it is cold and dreary and you need something to look forward to.
1. Select your seeds- peruse your seed catalogs and find the best varieties for your zone and site. Pay attention to disease tolerance.
- Try Heirloom Varieties: Bakers Creek is an excellent company with a nice website and catalog.
- Save Your Seeds: Even better, use your own seeds! See the book Seed to Seed for all about how to do just that.
- Rotation: To avoid pest and disease problems and to give the soil a break after high feeding crops, it is important to rotate plants of the same family each year. I highly recommend the book The Vegetable Gardener's Bible, I refer to it each year to plan my garden.
- Companions: Plants have friends that they like to hang around with. They may help each other grow in some way, or help deter pests. They also have plants they don't like like to hang around with. There is a good chart here and lots of good information in Gardening reference books like the one mentioned above.
- Organize: Number your beds for easy record-keeping and refer to previous year's garden plans.
- List: Write down a list of the plants you want to grow, and group by family. Next to each plant, write the bed numbers that are possible for that rotation and preferred growing conditions as well as it's preferred companions and/or plants to avoid.
- Puzzle Through: Look over your list and plan each bed. It make take a couple tries and shifting plants around to get the right mix.
4. Draw your Garden Plan - Draw a map of the garden from your list. Include number of plants and spacing (more research!)
5. Wait Anxiously for the Ground to Thaw- This is by far the hardest part of this whole process. Hopefully you are starting some seeds indoors and that will help with some of the cabin fever (starting seeds is a whole other post, stay tuned!).
Tuesday, January 6, 2009
Homemade Natural Deodorant
I know I'm not the only person out there who is not satisfied by the stuff they sell in the stores.
Many people have tested the different deo options, from Grist testing green' deodorants to Crunchy Chicken declaring her love for The Rock crystal deodorant. Even my sister wrote a post last year about her quest for a good natural deodorant.
So, I began my own quest, and it took almost half a year of trial and error to finally settle on something that worked for me. My criteria for a keeper is something that is cheap, easy to make at home, easy to use, doesn't irritate my skin, and of course it has to keep me smelling fresh as a daisy.
Homemade Lotion Bar Deodorant
After some research on the web, I found some basic recipes that I could combine to make a solid deodorant. I bought a lotion bar kit that included cocoa butter, beeswax, oils, and even the plastic deodorant tubes. I followed the included recipe, but I added aloe, baking soda, and cornstarch (mentioned in other recipes) and some lavender and tea tree essential oil.
Baking Soda
While I was recovering from the previous method, the only thing I could use was baking soda. I was surprised by how well this simple, cheap method worked. I found I had less odor even in hot sweaty conditions than with previous deodorants I had tried (even the chock-full-of-chemicals ones). I kept a cup of baking soda on my dresser and brushed it on with a makeup brush.
Baking Soda and Aloe Gel
The winning combination at last! I decided to try rubbing on a bit of aloe before brushing on the baking soda. This helped with the mess, and made sure I got enough on. Plus the aloe feels nice on my skin. I tried aloe right from the plant, but for efficiency I ended up with aloe gel in a bottle. My latest experiment has been mixing the aloe and baking soda into a paste, and storing in a jar. This works well too, is quicker to apply and travels well.
Many people have tested the different deo options, from Grist testing green' deodorants to Crunchy Chicken declaring her love for The Rock crystal deodorant. Even my sister wrote a post last year about her quest for a good natural deodorant.
So, I began my own quest, and it took almost half a year of trial and error to finally settle on something that worked for me. My criteria for a keeper is something that is cheap, easy to make at home, easy to use, doesn't irritate my skin, and of course it has to keep me smelling fresh as a daisy.
Homemade Lotion Bar Deodorant
After some research on the web, I found some basic recipes that I could combine to make a solid deodorant. I bought a lotion bar kit that included cocoa butter, beeswax, oils, and even the plastic deodorant tubes. I followed the included recipe, but I added aloe, baking soda, and cornstarch (mentioned in other recipes) and some lavender and tea tree essential oil.
Pros: Smelled nice, felt nice, easy to apply with the tube.
Cons: With the price of the kit and ingredients, cost about the same as natural deodorants in the stores.
Conclusion: It worked well for a while, but after a few weeks of use, I developed a rash and was unable to use any kind of deodorant for several days. That pretty much defeated the purpose, so I stopped using it. I started using it in summer- that may have something to do with it, or it might be the essential oils. I'm sure other people have come up with recipes that work for them, so feel free to experiment.
Baking Soda
While I was recovering from the previous method, the only thing I could use was baking soda. I was surprised by how well this simple, cheap method worked. I found I had less odor even in hot sweaty conditions than with previous deodorants I had tried (even the chock-full-of-chemicals ones). I kept a cup of baking soda on my dresser and brushed it on with a makeup brush.
Pros: Unbelievably cheap, easy, and works!
Cons: A little messy, I ended up with white powder on and around my dresser as I tried to apply the necessary amount.
Conclusion: Baking soda is the way to go, it absorbs odor and wetness, and surprisingly lasts all day. It never irritates my skin, and I like that it doesn't have a fragrance.
Baking Soda and Aloe Gel
The winning combination at last! I decided to try rubbing on a bit of aloe before brushing on the baking soda. This helped with the mess, and made sure I got enough on. Plus the aloe feels nice on my skin. I tried aloe right from the plant, but for efficiency I ended up with aloe gel in a bottle. My latest experiment has been mixing the aloe and baking soda into a paste, and storing in a jar. This works well too, is quicker to apply and travels well.
Pros: Still really cheap, easier to use, soothing to the skin, and works really great.Shopping List:
Cons: Sure, you have to get your hands in it, but it's a small price to pay for something that works this well.
Conclusion: I'm going to stick with this one, it works great for me!
- Aluminum Free Baking Soda
- Aloe Vera 100% Gel (no coloring or fragrances added)
Thursday, November 6, 2008
Update: Safe Home Air Fresheners
I love it when people comment on my posts! It reminds me to provide updates for my ongoing experiments.
In my earlier post about making your own oil diffusers I suggested using...
The reeds that they sell in the stores do work really well, if you can find some on sale. However, I am always looking for the natural and cheap options, so I stuck with twigs from plants in my yard. They cost nothing and I like the natural look. I found that the best ones were from a Hydrangea, but you can use any light, porous wood.
In my earlier post about making your own oil diffusers I suggested using...
"Porous wood to use for the reeds- bamboo, skewers, dowels, even interesting twigs or branches from your garden (I plan to try this later this year!)"...but as I found out, (and a comment pointed out and reminded me) bamboo skewers don't work very well to draw up the oil.
The reeds that they sell in the stores do work really well, if you can find some on sale. However, I am always looking for the natural and cheap options, so I stuck with twigs from plants in my yard. They cost nothing and I like the natural look. I found that the best ones were from a Hydrangea, but you can use any light, porous wood.
Wednesday, November 5, 2008
Fall Gleaning for Apples
A couple weeks ago, we spent a lovely fall afternoon picking apples, and came home with a big bushel full of the fresh crisp fruits for practically nothing.
It was the Annual Gleaning Day our local orchard. Every year, at the end of the season, they allow people to "glean" all the apples that are left on the tree. There were also pumpkins, squash and gourds, but we had our hands full with apples. All they ask is that you donate something to local food pantries (You are also limited to one bushel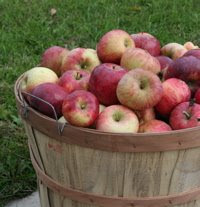 of apples and you have to purchase a basket for $3, but I can think of a million uses for a nice bushel basket!).
The apples that were left were not "perfect" like you see in the grocery store, there were some spots and knobs and misshapen fruit, but the taste is amazing. A cool crisp apple freshly picked from the tree is pure heaven. We have been eating them fresh for weeks, and I also made applesauce and canned some slices for pie.
I will be marking the calendar for next year's fall gleaning. It's a great way to get inexpensive healthy food, support your community, and it's a great way to spend an afternoon outdoors!
It was the Annual Gleaning Day our local orchard. Every year, at the end of the season, they allow people to "glean" all the apples that are left on the tree. There were also pumpkins, squash and gourds, but we had our hands full with apples. All they ask is that you donate something to local food pantries (You are also limited to one bushel
 of apples and you have to purchase a basket for $3, but I can think of a million uses for a nice bushel basket!).
The apples that were left were not "perfect" like you see in the grocery store, there were some spots and knobs and misshapen fruit, but the taste is amazing. A cool crisp apple freshly picked from the tree is pure heaven. We have been eating them fresh for weeks, and I also made applesauce and canned some slices for pie.
I will be marking the calendar for next year's fall gleaning. It's a great way to get inexpensive healthy food, support your community, and it's a great way to spend an afternoon outdoors!
Subscribe to:
Posts (Atom)